COPYRIGHT • Pls. respect the owner of this blog. Plagiarism is a serious crime so please don't copy or steal any photos and/or content from this blog.

Monday, December 27, 2010

A Review on Koshize, Kluge, and Sophie Velvet Nude Lipsticks

Hi everyone! So here is my review on the lipsticks that I had on my Sophie Cosmetics Haul post. As you can remember, I bought the tester/sample kits of Koshize and Kluge lipsticks and a Sophie lipstick in Velvet Nude. So just an overview, so far I'm really liking the lipsticks and their colors. I think all colors are wearable, depending on your taste of course.

The only thing that I don't like is the smell of the Kluge lipsticks. They don't smell awful or bad at all but they kinda smell like scented ballpens, like those really cheap ones that I once used when I was still in grade school. Yeah, those ballpens. Hehehe! The smell kinda hurts my nose. But apart from that, I can say that they are good lipsticks.

My favorite is the Sophie Velvet Nude lipstick. I'm really into nude or natural lip colors so it suits very well for me. It's also kinda matte but not too much, which I also like.

Okay, before I start, I must tell you guys that although I use daytime lighting for the photos, it may still have washed the colors out so it may appear a little lighter than actual.

So to begin with the review, I'm going to start with the Koshize Lipsticks. Below are the swatches. Their names (or codes) are, from left to right: LK9, LK19N, LK11N, LK23N, and LK10N. Can you guess which one's my favorite? Yup, LK19N. Hee hee.


Here's how they look on my lips:


So as you can see the LK9 is the most intense color, it's kind of like a ruby red. Then LK23N is the next intense which is a lovely bloody red color. LK10N is more of like a cherry red color which I also like. The 'palest' of them all is the LK19N. This color is perfect for very intense eye make-up such as smokey eyes. LK19N is my most favorite which is kind of like a nude pink color. I also like LK11N coz it has just the right amount of red and pink to it.

These Koshize lipsticks are very smooth to apply on the lips. They're not of matte texture so you won't be needing lipgloss over it. As for how long they last, they're okay. They're not really like one of those long-wearing lipsticks but they also don't don't wear out that easily.

So moving on to Kluge lipsticks, below are the swatches. Their names (or codes), from left to right: LKL13, LKL16, LKL21, LKL22, and LKL24. As you can see, the colors are more on the lighter/softer side. My favorite is the LKL24. It's almost like a nude pink color, just like LK19N from Koshize.

Here's how they look on my lips. As you can see, all the colors are very similar.

LKL13 is very glossy, it kinda has a light reflecting property to it which can make your lips look very very pale. I think this lip color is best if you have dark skin, it would really make your lips stand out. LKL16 and LKL21 are very very similar, it's hard to distinguish one from the other. On the other hand, LKL22 and LKL24 are very opposite. LKL22 is a soft cherry lip color while LKL24 is a nude pink color.

So far I really like these colors but as I mentioned, I don't like the smell. Ugh! They smell too sweet I guess, it really hurts my nose. In terms of how long they last, they're pretty much the same as the Koshize lipsticks, not really one of those long wearing lipsticks but good enough. These Kluge lipsticks by the way are very glossy and so smooth to apply. Again, no need to apply lip gloss over it.

Finally, my personal favorite so far -- the Sophie Lipstick in Velvet Nude. I'm really into matte, nude lipsticks so I really like this particular one. And it's not a pale nude but has a touch of coral into it so it doesn't make your lips too pale. I think this is one of those lipsticks that you can just put on when you're running for an errand, etc. where you don't have any foundation or any other make-up on your face.

Here's the swatch:

And here's how it looks on my lips:

As you can see, the color is really natural looking. I love it! :)

So I guess that's all for my review guys. Hope you find this very helpful. 'Kay so I'll talk to you soon. Bye!


Saturday, December 25, 2010

Frosted Candy Cane Nails

Hey guys! So I just made this nail art design for you, again, perfect for the holidays! So this design is kind of like an 'upgraded' version of the Easy Candy Cane Nails. Instead of a red background, I used a glittered one and then drew some red and white stripes across it. While the Easy Candy Cane Nails is great for casual wear, this design is perfect for holiday parties!

So here are the nail polishes and tools that I used:

From left to right:

  • Caronia Nail Hardener and Base Coat
  • Sweet Cherry Nail Polish in "Silver Glitter"
  • Twinkle Nail Polish in "Gold Glitter"
  • Caronia Nail Polish in "Frosted Red Pearl"
  • LA Colors Art Deco in "White" (you may also use a detail brush and white nail polish)
  • a detail brush
  • Caronia Fast Dry Top Coat
Here's how:
  1. After applying your base coat, apply two coats each of the silver glitter and gold glitter alternately.

  2. Using a detail brush dipped in frosted red color, draw some thick diagonal lines across the nail. Then, using LA Colors Art Deco in white, draw a thick diagonal line on one side of the red and thin ones on the other side.

  3. Wait for the nail polishes to dry and then apply top coat. That's it! Make sure to clean the edges with a cotton bud dipped in nail polish remover for that clean, tidy look. And don't forget to apply top coat after two days in order to maintain your mani.
And here's the video tutorial. Music is called "Kasadya Ning Taknaa", a classic Cebuano Christmas carol/song.


Hope you guys like the design and give it a try! Let me know if you do. Okay so I'll talk to you later. Bye!

Thursday, December 23, 2010

Easy Candy Cane Nails

Hey everyone! So here’s another nail art tutorial for you which is perfect for the holidays! I call it Easy Candy Cane Nails. Now I don’t take full credit for this design because I know that there has been a lot of people who has done this nail art before I did, but I just thought that it would be cool to share with you guys how I do it :)

So for the nail polishes and tools, you would need the following:

From left to right:

  • Caronia Nail Hardener and Base Coat
  • Caress Nail Polish in "Jealousy"
  • LA Colors Art Deco in "White" (you may also use a white nail polish and detail brush if you don't have the Art Deco)
  • Caronia Fast Dry Top Coat
Here are the steps:
  1. Start with your base coat. Then, apply two coats of the red color.

  2. Using LA Colors Art Deco in white (or a detail brush dipped in white nail polish), draw some thick diagonal lines across the nail. Then, apply think diagonal lines beside the thick ones.

  3. Wait for the nail polishes to dry and then apply top coat. And you're done! As always, you may reapply top coat after two days in order to maintain your mani.
Here's the video tutorial. Music is called "We Wish You" from Kevin MacLeod (incompetech.com) Licensed under Creative Commons 3.0.


So I hope you guys enjoy this tutorial and I'll talk to you soon! Bye!

Sunday, December 19, 2010

Sophie Cosmetics Haul

Yaaay! My Sophie goods have finally arrived! I've been waiting for these for 4 days; shipment got delayed because of the bad weather, but anyhoo, I'm just glad it's here :)

I was a little bit bummed though coz there were some unserved orders which I was really looking forward to especially the SAS Extreme Effect Mascara and the Glamorous Treatment Shampoo and Conditioner (I've been wanting to grow my hair long again). Out of stocks daw. Well I guess I'd just have to wait for those to be in stock again, or better yet, shop for another brand! Hehehe.

In case you don't know, Sophie (Martin Paris) is a direct-selling company which started in Indonesia. They recently opened a branch in the Philippines (Manila) and a couple Business Centers in Cebu. About a year ago I decided to become a member of Sophie Martin because I really like their products. Their main products actually are bags and wallets which are designed by French designers. I was also attracted by their beauty line and I thought I'd give it a try. I might also be opening an online shop for their products soon so watch out for it! :)

So anyway, this is actually my second haul. The first one was like a year ago and it was mostly on bags and skin care, less on cosmetics. For this second haul I decided to concentrate more on the cosmetics and try out their make up, which are all from the Koshize brand. So I'm just gonna show them all to you guys and I'll just do a separate post for the review.

Okay so first I bought their Perfect Skin Daily Foaming Cleanser (for acne prone skin) which is also the one that I've been looking forward to in this package. Although I don't have acne/pimples, I realize that it's good to use this type of facial cleanser since it's anti-bacterial and can prevent the formation of breakouts. Prevention is better than cure ;)

I also included their Facial Cleansing Pad which is made of silicon. It has these tiny bumps on one side which acts like a gentle facial scrub to help clear up the pores and remove blackheads and dead skin cells. I think both are a really great pair.

We all know that foundation or face powder is the very basic make up. It helps keep our face looking fresh and shine free. I really like the T-zone Compact powder that I purchased from them last year so I decided to try out their Liquid Foundation and Silk Loose Powder as well.

I also decided to give their unique Blush On a try. I find it unique (in terms of look and packaging) because instead of the usual packed powder, it's in the form of small pearls. You'd have to be very careful though when opening it coz the 'pearls' might fall off. That's actually what happened when I opened it, that's why you can see that some of the pearls are broken. Oh well!

I also got their Tester Lipsticks (Koshize & Kluge brands) which as you can see are very very tiny, but are really great for testing out different lip colors. I'm surely gonna be showing swatches on my review.

Another thing that I got is one of their Sophie Lipsticks and it's called Velvet Nude, which is a gorgeous nude color. And oh, it smells like donuts ^_^

Then I got a Koshize Eye Liner Pencil in brown, a Koshize Lip Liner in red, and a Koshize Eye Brow Pencil in black.

Next is their [2] Phase Make-Up Remover. Well, any make-up enthusiast gotta have a make-up remover, right?

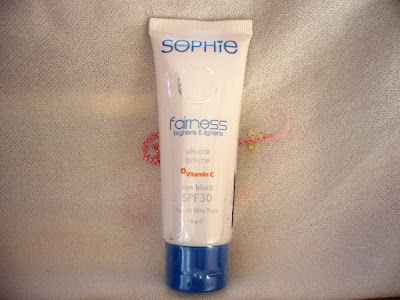
I also bought their Fairness Daily Sunblock in SPF 30. I don't really use a daily sunblock before but I realized now that it's quite important to use sunblock everyday especially if you're always exposed to the sun and most importantly that it's very hot these days. We don't want those premature wrinkles!

So the last but definitely not the least that I bought is their Eye Pen Liner. I saved this for last because it's my favorite! It's a felt tip eyeliner, and it's kind of like a liquid eyeliner but it has a different 'concept', so to say. I think the best thing to describe this is by what it's called --- it's a Pen Liner. It has the same concept as your regular sign pen but you use this for the eyes instead. So you don't need to dip a wand unto a liquid eyeliner; this Eye Pen Liner already functions like a pencil eyeliner except that it gives you a liquid eyeliner finish.

Well I guess that all! And as I mentioned, once I'd be able to try them I'll be writing a review on these goodies on a different blog post.

So I hope you guys like this post and I'll talk to you soon!

Saturday, November 27, 2010

Close Up White Now Toothpaste - A Review

(Pre-Script: I'm sorry if you guys can't see the photos. I can't either :( I don't know why. It was fine the first time I uploaded them but after a few days they just went MIA. Unfortunately, I can't retrieve them anymore coz I already deleted them and I have no back-up. Anyway, I still stand by my review and I'm not going to delete this post just because the photos are broken. Hope you guys still find this review helpful.)

So I've seen this ad about Close Up White Now toothpaste that promises instant white teeth after just one brushing. I was intrigued since I've always been wanting to have pearly white teeth but I can't afford to go to the dentist. So I decided to try the Close Up White Now.

Okay, before I proceed, I would just like to apologize for posting my icky before shot :D I know it looks gross but I think I'd be giving you a better review if I'd take a before shot. So here it is...

I know! Gross! Heehee! I haven't brushed my teeth for this :D

So for the toothpaste, I used this much amount:

I know, I'm that desperate, LOL!

Here's the "after" shot after one brushing:

So! What's you're verdict? Do you think it made my teeth whiter? Hmmm...Personally? I don't. I mean, it obviously made my teeth a lot cleaner but whiter? I don't think so. I didn't really see much of a difference.

So in conclusion I can say that I was a bit disappointed with the Close Up White Now toothpaste. It said in the package that it could make my teeth whiter in just one brushing but it didn't. I'm still gonna continue using it though in the hope that it can whiten my teeth with continued use.

So how about you guys? Have you tried using Close Up White Now? Let me know how it went for you. I would love to hear your reviews!

Till next time!

Thursday, November 25, 2010

DIY: Homemade Refreshing FacialToner

Wazzup ladies! Today we're gonna make our very own facial toner, which is a mixture of lemon, green tea, and a little rice vinegar or sake (rice wine). Before we start, let me just tell you the benefits of our homemade toner.

  • Lemon, which is rich in vitamin C, is known for its whitening properties. It helps even out skin tone and reduce sunspots and other skin discoloration. When heated, it naturally produces salicylic acid, which is a main ingredient for fighting acne and pimples. It also prevents blackheads, whiteheads, and other skin blemishes.
  • Green Tea is a well known anti-oxidant. It helps fight free radicals, thus preventing skin damage caused by pollution and frequent sun exposure.
  • Rice is known for its anti-aging properties. Japanese monks, who make the rice wine (sake), have hands that are baby soft and wrinkle free. So rice vinegar or sake will not only act as a natural preservative for our toner but also acts as skin whitener and wrinkle preventing ingredient.
So to start off, here are the things (and ingredients) that you would need:


  • An empty container. You can recycle your old toner's bottle or an alcohol bottle.
  • About 8 to 10 pieces of kalamansi (or about 2 pieces lemon) thoroughly cleansed and washed.
  • One bag of green tea, and
  • Rice Vinegar (you can buy this at the supermarket/grocery stores). You may also use rice wine (or sake) but it's more expensive.
So first we're going to brew our green tea according to package instructions, but we're just gonna use one cup of water. We're also gonna squeeze our lemons or kalamansi. Make sure to take out all the seeds.

For the sake or rice vinegar, we're just gonna use 1 tablespoon. Combine all the ingredients together and pour it into the bottle (you may use a funnel). And that's it! You now have your own homemade, all-natural refreshing facial toner.

I recommend storing this in the fridge and consuming it for at most a month. Sometimes I like storing it in the freezer or meat chiller (if it still has room) but usually I just store it in the bottles section of the fridge. And the cold temperature actually adds a more relaxing and refreshing feeling when you apply it to your skin.

You can also use this for your arms, legs, and the rest of your body, especially on those areas where you need whitening such as the elbows and knees.

And one more thing, because of the lemon, this toner actually also acts as a natural mosquito repellent, and I can attest to that! Ever since I was a kid, I'd always been a target of mosquitoes, until I used this toner ;) I actually didn't know at first that lemon is a natural mosquito repellent. Before, the only natural mosquito repellents that I know of were citronella, thyme and eucalyptus. I did use citronella oil one time but I didn't like the smell so I just stopped using it.

When I started using this toner, I noticed one night while I was sleeping that a mosquito (or mosquitoes) was biting on my arms but not on my face, and usually when this happens I just cover up my arms (and legs) with the blanket, and then the mosquitoes would then proceed to feast on my face which is the only exposed part of my skin. But that particular night, I noticed that after I covered my body with the blanket, the mosquito/oes didn't go for my face, and I woke up the next day with no single mosquito bite on my face at all. So that's when I started to wonder, did it have something to do with the lemon toner? I then started to Google "lemon + mosquito repellent" and then that's when I learned that lemon is one of nature's mosquito repellent. Mosquitoes don't like the smell of lemon (or something in the lemon that they don't like) so they tend to stay away from any surface that has lemon on it :) I was so elated by this discovery that I decided to use this toner unto my arms, legs, neck, and the rest of my exposed skin. And yep, I don't have a single mosquito bite ever since. Weeeeeh! :D

So I hope you guys enjoyed this DIY. Have a happy weekend :)

Oh by the way, I'd have to tell you guys that since this is just a homemade product, it doesn't have any "approved therapeutic" claims or whatsoever . Personally since I've been using this, it has done a great job on my skin but note that it doesn't necessarily mean that it would also do the same for yours since we all have different skin types. So I guess what I'm trying to say is that, do your own research first before trying it out okay?

So yeah, I guess that's it and I'll talk to you soon! :)

Wednesday, November 24, 2010

'Frostree' Nails

Hey ladies! The holidays are fast approaching so today we're gonna be doing this nail design which is a perfect casual nail design for the holidays. I call them "Frostree Nails" (kind of like a combination of Frosty and Tree). As you can see there's some sort of a green inverted triangle on it --- this represents our Tree. And those white star-looking things around it are our Frost. This is a relatively easy design, however I must say that you might be having a little difficulty with the Frosts. If you are, here are my suggestions, you can ask your friend (or mother/sister/even your boyfriend!) to do the Frosts for you. You can also just use some ready made frost stickers and just stick them to your nails, or you can just use tiny dots instead (using a toothpick as your dotting tool).

So here are the nail polishes and tools that I used for this nail design:

From left to right:

  • Caronia Nail Hardener and Base Coat
  • Klik Nail Polish in "Baby Blue"
  • Klik Nail Polish in "Frosted Blue Pearl"
  • Caress Nail Polish in "Green Minded"
  • Caress Nail Polish in "Avocado"
  • LA Colors Art Deco in "White" -- you can buy this at Metro Ayala Department Store.
  • (optional) Sweet Cherry Nail Polish in "Glitter Silver" or Twinkle Nail Polish in "Glitter Gold"
  • Caronia Fast Dry Top Coat
  • Detail Brush --- you can also use this instead if you can't find the LA Colors Art Deco. Just make sure that the white nail polish that you use has a thicker consistency so that you won't be having a hard time creating the Frosts.
So here are the steps:
  1. Apply your base coat. Then, apply two coats of the Regular Baby Blue color. Wait for a few minutes and then apply one coat of the Frosted Blue Pearl color.

  2. Taking the Green Minded color nail polish, put some of it on a piece of paper. Then grab your detail brush and dip it unto the nail polish. Draw a V-shaped outline extending from the center of your nail to the tip.
  3. Then, taking your detailed brush again, dip this unto the Avocado color nail polish and fill in the space between your V outline.
  4. Using LA Colors Art Deco in white (or a detail brush dipped in white nail polish), draw some star shaped frosts all over your nail.

  5. Wait for the nail polishes to be fully dried and then apply your top coat.
    Useful tip: Maintain your mani by applying top coat every two days.

Done! You may also add a layer of silver/gold glitters for a more frosted look.

Here's the video tutorial (Music used is by Jason Shaw (at audionautix.com under Creative Commons 3.0) called Lazy Day for the intro and 12 Mornings for the rest of the video):


So I hope you ladies like this nail design and give it a try. I'll talk to you soon!

Related Posts Plugin for WordPress, Blogger...

  © 2010-2014 nica Xandy. Powered by Blogger.

BACK TO TOP